Last Updated on December 10, 2022
Laminate flooring is a preferred choice for flooring in many homes. It is durable, easy to maintain, and comes in a variety of colors and styles. However, like all types of flooring, it is not indestructible. Cracks or chips in laminate flooring may be unsightly and lead to further damage.
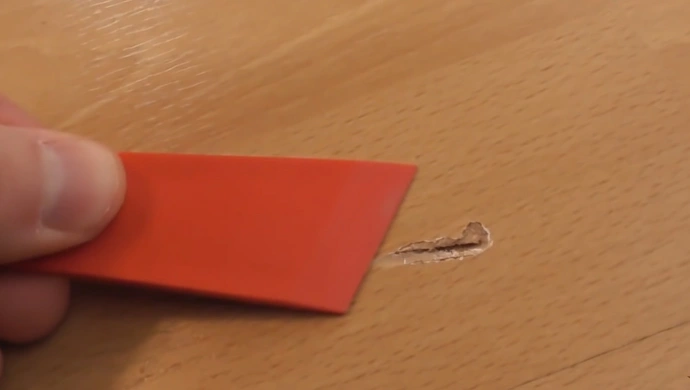
Chips in your laminate flooring can be both unsightly and dangerous. If you don’t fix them quickly, the chips can get bigger and more tricky to repair. Plus, if water or other liquids get into the chip, it can cause the wood underneath to rot, which will only make the problem worse.
Fixing chips in your laminate flooring is a quick and simple process with the right tools and materials. After a little work and attention, you can have your floor looking like new in no time. Below you will find instructions on how to fix chips in laminate flooring so that it looks great for years to come.
How to Fix Chips in Laminate Flooring : Easy Steps
It’s inevitable-sooner or later, your laminate flooring is going to suffer from some chips and scratches. Whether it’s from a pet’s nails, a dropped object, or simply from everyday wear and tear, the damage is bound to occur. But don’t despair.
In most cases, chips and scratches can be easily fixed with a little effort and the right materials. Here’s a step-by-step guide on repairing laminate flooring chips:
What you will need:
- Cleaning supplies
- Vacuum cleaner with soft brush attachment
- Damp cloth
- Touch-up paint
- Fine-tipped brush
- Sandpaper (medium and fine grit)
- Wood filler or glue
- Putty knife
- Toothpick (optional)
- Laminate flooring (specifically the manufacturer’s recommended type of paint)
Instructions:
Step 1: Sweeping or Vacuuming the Floor
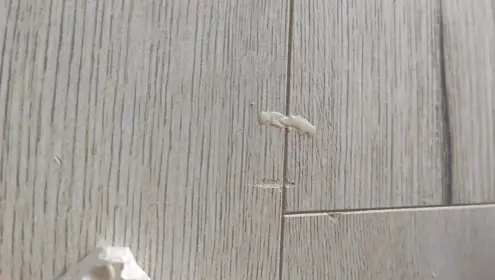
In order to fix a chip in laminate flooring, start by sweeping or vacuuming the floor to remove any dirt or debris. Then, use a damp cloth to wipe down the area where the chip is located. Once the area is clean, you’ll be able to better assess the problem and determine what type of repair is necessary.
Before starting any repair project, it’s important to make sure that the surface you’ll be working on is clean. Otherwise, you run the risk of dirt and debris getting caught in the repair material, which can create an uneven finish.
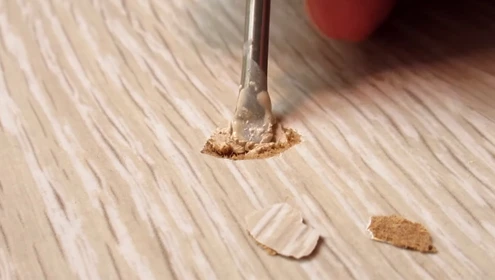
Step 2: Applying wood filler or glue
Next, you’ll need to apply wood filler or glue to the chip. If you’re using wood filler, be sure to follow the manufacturer’s instructions. Once you’ve applied the filler or glue, use a putty knife or other object to spread it evenly over the chip. You can also use a toothpick to help apply the repair material into small cracks and crevices If necessary.
Step 3: Letting the filler or glue dry
After applying the filler or glue, let it dry completely before proceeding to the next step. Be patient if this takes several hours or even overnight. Once the filler or glue is dry, you’ll be able to sand it down and create a smooth surface. Depending on the type of repair material you’re using, it may take some time for it to dry completely.
Step 4: Sanding down the filler or glue
You will need to use a piece of sandpaper to remove any excess filler or glue from the area after the glue or filler has dried. Start by sanding down the area around the chip with medium-grit sandpaper until it has a smooth appearance. By doing this, you will be able to remove any rough edges so that the filler can adhere to a smooth surface.
Then, sand the area with fine-grit sandpaper to give it a final polish. This will create an even finish on the floor and will help to blend the repair area into the rest of the floor. Last but not least, you should check if there is any visible unevenness on the floor. If there is not, you have finished this step.
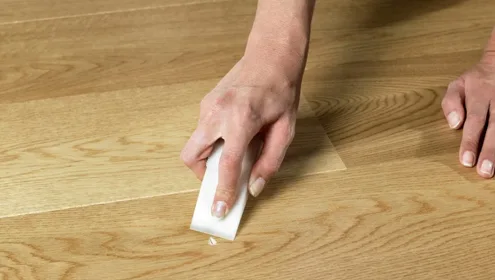
Step 5: Cleaning the area
After you have sanded down the filler or glue, it is important to clean the area in order to remove any debris that could cause problems later on. This can be accomplished by using a vacuum cleaner equipped with a soft brush attachment. Vacuum the area thoroughly, paying special attention to the edges and corners.
Once you have finished vacuuming, wipe the area down with a damp cloth to remove any remaining dust particles. Allowing the area to completely dry before proceeding the next step will ensure that your repair job will be successful.
Step 6: Applying touch-up paint
Finally, you’ll need to apply touch-up paint to the chipped area. When considering a paint color, it is important to select one that closely matches the color of your laminate flooring. Once you have found the right shade, use a fine-tipped brush to apply the paint to the chips. Work slowly and carefully to avoid making any mistakes. Once the paint is dry, your laminate floor will look good as new.
If you’re not sure what type of paint to use, consult the manufacturer of your laminate flooring. They will be able to recommend a specific type of paint that will work well with your particular brand and style of flooring.
Following these steps will help you resolve laminate flooring issues quickly and easily. In most cases, you won’t even need to call in a professional to get the job done. So, why not give it a try? You may be surprised at how easy it is to achieve professional-looking results.
Tips for Preventing Chips in Your Laminate Flooring
As anyone who has installed laminate flooring knows, chips can be a major problem. Not only are they unsightly, but they can also weaken the overall structure of the floor and create tripping hazards. There are a few simple steps that you can take to help prevent chips in your laminate flooring.
First, make sure that you always use protective mats or pads underneath heavy furniture. This will help to distribute weight evenly and prevent sharp edges from damaging the floor.
Secondly, avoid walking on the floor with high heels or other sharp objects. If possible, place rugs or mats at all entrances to help catch dirt and debris before it has a chance to crack the floor.
Finally, be sure to clean up any spills immediately. Liquids can quickly seep into the cracks and weak spots in the floor, causing swelling and eventually leading to chips. By taking these simple precautions, you can help keep your laminate flooring looking like new for years to come.
Why does Laminate Flooring Chip?
The laminate flooring can be damaged, and one of the most common problems is chipped laminate flooring. There are a few different reasons why this may happen.
One possibility is that the floor was not properly installed. If the laminate pieces are not tightly fitted together, they may become loose over time and be more susceptible to damage.
It may also be the result of improper cleaning or maintenance. Laminate floors need to be swept or vacuumed regularly to remove dirt and debris, and they should also be mopped with a gentle cleanser.
If these steps are not followed, the surface of the laminate may become dull or scratched, making it more vulnerable to chips. Finally, heavy furniture or appliances can also cause chips in laminate floors. If something is dropped on the floor, it can create a chip or crack.
FAQs about Fixing Chips in Laminate Flooring
Can You Replace a Single Piece of Laminate Flooring?
It is possible to replace a laminate flooring board when it becomes scratched, chipped, or otherwise damaged, rather than having to replace the entire floor. To do this, start by removing the faulty board and taking it to a local hardware store to find a replacement that matches in both color and size.
Use a putty knife to apply glue to the back of the replacement board. After inserting the board, gently tap it into place with a hammer.
How Do You Repair Deep Scratches in Laminate Flooring?
If the scratch is only superficial, you can likely repair it with a simple wax pencil or crayon. If the scratch is more severe, you may need to use a laminate floor filler kit.
These kits usually come with putty or resin that can be used to fill in deeper scratches. Once the filler has dried, use sandpaper to smooth it out. Finally, apply a coat of touch-up paint to match the color of your floor.
Can Laminate Flooring be Removed and Reinstalled?
Yes, laminate flooring can be removed and reinstalled. However, it is important to note that laminate flooring is not designed to be removed and reinstalled multiple times. The tongue-and-groove system that holds the planks together can become damaged after being removed a few times, making it difficult to get a tight fit.
How Do You Clean Laminate Floors without Leaving Streaks?
When it comes to cleaning laminate wood floors, always use a microfiber mop or cloth when mopping first – this will help to pick up any dirt and debris without scratching the floor. Second, use a diluted vinegar solution or gentle cleaner – harsh chemicals can damage the flooring. Finally, be sure to rinse the floor well after mopping to remove any cleaners or residue.
What is The Best Way To Protect My Laminate Floor from Scratches?
To protect your laminate floor from scratches, the first step is to make sure you vacuum or sweep the floor regularly to clear any particles that could scratch the surface. You should also place rugs at all entrances to your home to help catch any grit or sand that could be tracked in. Finally, if you have pets, trim their nails regularly to prevent them from scratching the floor.
Final Thoughts
While chips in laminate flooring can be a major pain, they don’t have to be a permanent problem. Put in a little effort, and you’ll find how to fix laminate flooring chips yourself without hiring a professional. Just follow the steps outlined in this guide, and you’ll have your floor looking good as new in no time.
We hope you found this article helpful. If you have any questions or comments, please feel free to share them with us in the section below. Thanks for reading.
You Might Also Like: Does OSB paneling work in showers?
