Last Updated on December 14, 2022
Laminate floors are a type of hardwood flooring that combines multiple layers of material to create a durable, easy-to-care-for surface, but laminate flooring installation for an L-shaped entryway is a little harder since you have to work around the different angles and corners.
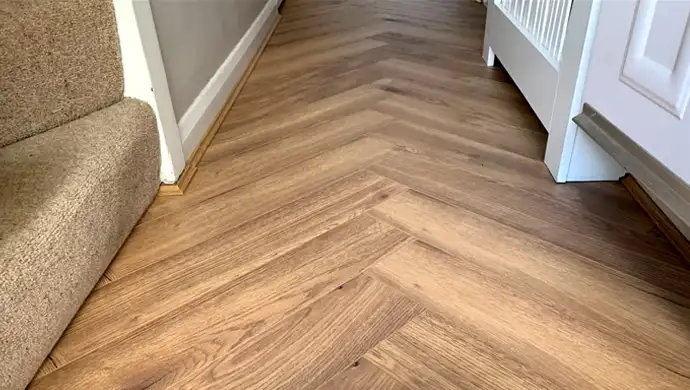
One of the most appealing features of laminate floors is their resistance to damage, that’s why it is necessary to know how to lay laminate flooring in an L shaped hallway properly for the best results.
Unlike hardwood floors, laminate floors can withstand heavy foot traffic and furniture without showing signs of problems. Also, laminate floors are hygienic and require little maintenance, making them an ideal choice for busy families or office spaces. Let’s look at this in greater detail below.
How to Lay Laminate Flooring in an L Shaped Hallway?

If you plan to install a laminate wood floor in your home, you may wonder how to lay laminate flooring in l shaped hallway. The good news is that it is not as difficult as you think. Here is a step-by-step guide to help you get the job done:
Step 01. Do the Measurements:
The first priority is to take accurate measurements of the space. This will ensure that you have enough material to complete the job and help you avoid wasting any wood flooring.
To get started, measure the length and width of the largest wall in the l-shaped hallway. Then, determine the size of the shortest wall. Once you have these measurements, you can determine how many laminate boards you need and how they should be laid out.
It might be necessary to adjust for any doors or other obstacles in the space. When you plan carefully and take accurate calculations, you will be able to confidently lay laminate floors in your l-shaped hallway.
Step 02. Collect All Materials:
Before you begin any home improvement project, make sure you gather all of the necessary materials. This will help you to gather everything you need so that the project goes smoothly. When you are putting in laminate flooring for an L-shaped corridor, you must collect a few key items:
- Tape measure
- Level
- Hand Saw/coping saw
- Hammer
- Tapping block
- Laminate flooring
- Pull bar
- Spacers
- Foam underlayment
- Laminate flooring cutter
Step 03. Prepare Your Floor:
Assuming you have chosen your laminate flooring and collected all the needed materials, the next task is to prepare your floor. This is particularly important for L-shaped halls, as you have to make certain the joints between the sections of flooring are strong and tight-fitting.
Start by clearing out any furniture or rugs from the area. Then, sweep or vacuum the floor to remove any debris or dirt. Next, check the floor for any bumps or unevenness.
If necessary, use a sanding block to level out any high spots. Once the floor is smooth, clean it with a damp cloth to take away dust particles. Now you’re ready to begin installing your new laminate flooring.
Step 04. Acclimate the Flooring to the Interior Decor:
Once you have your subfloor prepped and the baseboard or shoe molding removed, it’s time to begin acclimating your laminate flooring to the temperature and humidity of your home.
This process is vital because if the boards are not properly adapted, they may shrink or expand once they’re installed, leading to gaps or buckling.
To acclimate the laminate floor board, lay them out in the room for at least 24 to 48 hours where they will be installed, making sure that there is a gap of at least ¼ inch between the panels and the wall. If possible, try to arrange the panels to run parallel to the longest wall.
Step 05. Install the Underlayment:
Underlayment is a critical step in the process of installing laminate flooring. Not only does it provide a cushion for the flooring, but it also helps to reduce noise and prevent moisture damage. It is crucial to ensure the pieces fit together snugly when installing foam underlayment.
Otherwise, gaps may allow water or other liquids to seep through. In addition, foam underlayment can be susceptible to tearing if not handled carefully. For these reasons, it is imperative to take care when laying foam underlay along an L-shaped corridor.
Step 06. Install the First Row of Laminate Flooring:
Cut a piece of laminate to this size and lay it down in the doorway, ensuring that the end is flush with the door frame. Position the first piece, so it overlaps the underlayment by about one inch. By doing so, you will verify that the joints are correctly aligned.
Once you have the first piece in place, use a level to make sure that the piece is level, then use a hammer to secure the piece. Repetition is necessary with the remaining laminate pieces, working your way down the hallway.
You will want to do this for each piece of laminate until you reach the finish line of the hallway. When you get to this point, you may need to use a jigsaw to cut the pieces to fit.
Step 07. Install the Rest of the Flooring:
Now you can finish installing the tiling. Begin by doing a dry fit of the boards, starting at the farthest wall and proceeding across. If it is needed to make adjustments, now is the time to do it. Once satisfied with the fit, start installing the boards using a pneumatic nailer.
Start from the edge and proceed forward, keeping the boards as close together as possible. It is essential that there is at least a 1/4-inch gap between the wall and the boards to allow for expansion. Once the panels are cut, snap them into place using a rubber mallet.
Don’t forget to align the tongue and groove properly before snapping them together. Continue the installation as long as the hallway is complete. If any excess material remains, use a saw to trim it off. Finally, seal the edges of the flooring with silicone caulk to prevent water damage.
Step 08. Add Finishing Touches:
The final step is to make final adjustments. This includes trimming the doorways and installing molding around the room’s perimeter. Additionally, you might need to install transition strips where the laminate meets other types of flooring, such as carpet or tile. These will give your new floor a polished look and help it withstand heavy traffic.
Pros & Cons of Laminate Flooring in a Hallway

Hallways are highly trafficked areas of the home, so when it comes to choosing a flooring material, you should consider both the pros and cons.
Laminate flooring is a popular choice for hallways because it is durable, maintenance-free, and relatively inexpensive. Although laminate flooring has some advantages, it also has some drawbacks.
PROS of Laminate Flooring:
- Due to its durability and low maintenance requirements, laminate floor covering is favored by many homeowners.
- Laminate flooring is a wise choice as a sturdy flooring option that resists scratches, stains, and fading.
- Cleaning laminate surfaces is a simple matter of sweeping or vacuuming regularly to remove dust and dirt.
- You are likely to find something to suit your tastes with laminate since it comes in various styles.
CONS of Laminate Flooring:
- Water damage can occur to laminate flooring because it is not as water-resistant as some other materials.
- Laminate flooring may not be the best choice in cold climates since it provides only limited insulation.
- As laminate flooring requires a level subfloor for installation, you will need to address any unevenness in the subfloor before laying the new flooring.
FAQs
Here are some frequently asked questions about laminate floors in a passageway:
Q: Where Do You Start Laminating in an L Shaped Room?
You should start laying laminate along the wall that forms the inside of the “L.” By doing so, the two laminate sections meet evenly and create a seamless look.
Plus, starting from the inside will make it easier to work your way outwards without worrying about cutting accurately along with corners or edges.
Q: Does It Matter Which Way You Lay Laminate Flooring?
Yes, it does make a difference how & which direction you affix the laminate flooring. The boards should always be laid in the same order, preferably with the grain running in the direction of the longest length.
This will create a sense of continuity and proportionality within the space. Laying laminate flooring parallel to the wall provides a more consistent appearance. It is best to avoid having any joints running perpendicular to the room’s length, as this will be more visible.
Q: Do You Need to Put Anything Under the Laminate Flooring?
Yes, there should be underlayment beneath laminate flooring. This is because underlayment provides a smooth, level surface for the laminate planks to lie on and helps reduce noise. If you have an old laminate floor that is starting to show signs of aging, you may also want to consider replacing the underlayment.
Q: How Soon Can You Walk on Laminate Flooring?
You can walk on laminate floors as soon as they are installed. There is no need to wait for them to cure or anything like that. Doing so is a good idea, as it will help the flooring settle in. Just remember to clean up any dirt or debris that might have been tracking in so that you don’t scratch the floor.
Conclusion
Laying laminate flooring in an L-shaped hallway can be tricky, but you can accomplish it with careful planning and patience. It is vital to consider the direction of the boards and the expansion gap that will be needed at the end of the installation. Once these things have been determined, the entire process is relatively straightforward.
Be sure to leave an expansion space of a minimum of 1/4 inch between each flooring run. With a little bit of care and careful preparation, laminate flooring installation will be a rewarding experience.