Last Updated on July 28, 2023
Are you considering removing your glued-down engineered hardwood flooring? While this may seem like a difficult task, it is possible to remove the wood without damaging the subfloor. However, before you start the process, there are a few things you need to consider.
It’s important to know that removing glued-down engineered hardwood flooring is not an easy task and requires a lot of patience and effort. You’ll need to have the right tools and know-how to avoid damaging the subfloor or the hardwood planks.
We’ll guide you through the steps on how to remove glued-down engineered hardwood flooring and provide you with tips and tricks to make the process smoother and easier.
How to Remove Engineered Hardwood After It Is Glued? Steps to Follow

To remove engineered hardwood after it’s glued, you need to follow these five steps:
- Step #1: Prepare the Work Area
- Step #2: Gather the Necessary Tools
- Step #3: Find a Starting Point
- Step #4: Cut and Remove the Flooring
- Step #5: Remove the Remaining Adhesive
Let’s take a look at the steps.
Step #1: Prepare the Work Area
Before starting, make sure the room is free of any furniture or obstacles, and cover any items that can’t be removed with plastic sheeting to protect them from dust and debris. This will help ensure that the area is clear and safe for removing the glued engineered hardwood.
It’s important to wear appropriate protective gear, like gloves, safety goggles, and a dust mask, to keep yourself safe while preparing the work area. These items will help protect you from any dust or debris that may be released during the removal process.
Once the area is clear, you can begin preparing the tools you’ll need to remove the engineered hardwood. This may include a pry bar, hammer, and scraper. Make sure your tools are sharp and in good condition, as this will make the removal process easier and more efficient.
Step #2: Gather the Necessary Tools
After preparing the work area, it’s time to gather the tools needed for the removal process. You will need a circular saw to cut the engineered hardwood into manageable pieces.
A pry bar will help you to lift and remove the flooring, while a hammer can be used in conjunction with the pry bar to loosen the boards. Additionally, a chisel can assist in separating the glued sections and removing any remaining adhesive.
To ensure that all stubborn adhesive residues are removed, you will also need a floor scraper or adhesive remover.
An oscillating tool with a scraping attachment can also be used for more challenging adhesive spots.
Step #3: Find a Starting Point
Now it’s time to pinpoint the perfect starting point for your removal process, so you can smoothly lift and separate the boards without causing any damage.
If you’re lucky, you may find a loose board that can be easily pried up with a pry bar or a designated area marked with painter’s tape.
However, if you can’t find a suitable starting point, you may need to create one by cutting a 1’x1′ square of flooring with a circular saw.
Here are some ideas to help you find the best starting point:
- Look for areas where the flooring is already damaged or worn out, as these spots are more likely to be loose or separate easily.
- Check for any gaps between the boards, as these may indicate areas where the adhesive has failed or the boards have shifted.
- Use a stud finder or tapping method to locate the floor joists underneath the flooring, as these may provide additional leverage for lifting the boards.
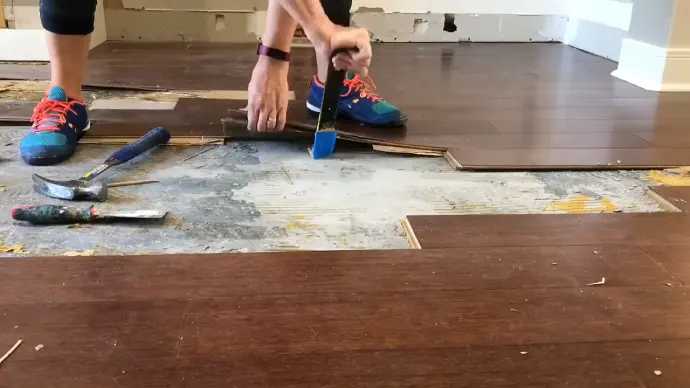
Step #4: Cut and Remove the Flooring
You’ll need to cut and remove the flooring now. To cut and remove the flooring, grab your circular saw and start making perpendicular cuts along the seams of the boards closest to your starting point. It’s important to work slowly and carefully to avoid damaging the subfloor.
Begin prying up the boards using a pry bar and hammer. Start with the boards with the longest area that aren’t connected.
As you lift the boards upward, separate them from the adhesive by gently tapping the pry bar with a hammer.
However, if you notice a spot on the wood flooring that starts to crack or rip apart, move to a different part of the board to remove it in one piece. To keep track of the progress, use a table to record the number of boards removed and their condition.
This will help you stay organized and ensure that you don’t miss any damaged areas. Remember, removing glued-engineered hardwood flooring requires patience and attention to detail, so take your time and work carefully.
Step #5: Remove the Remaining Adhesive
Don’t forget about the remaining adhesive on the subfloor, as it may require some extra effort to remove using a chisel and hammer or an oscillating tool with a scraping attachment. Be careful not to damage the subfloor while removing the adhesive residue.
Use a chisel and hammer to scrape off any remaining adhesive layers. Take care not to apply too much force while doing this, as it may cause damage to the subfloor.
If the adhesive is stubborn or hard to reach, you may need to use an oscillating tool with a scraping attachment. This tool can easily remove any remaining adhesive and reach tight spaces.
If the adhesive residue is still present, you can employ a floor scraper or an adhesive remover/stripper to remove it further. Always follow the manufacturer’s instructions for these products carefully, as they can be harmful if not used properly.
Can you reuse the removed glued-down hardwood flooring?

It is possible to reuse hardwood flooring if it is in good condition and undamaged during the removal process.
If the flooring boards remain intact and free from excessive adhesive residue, they can be cleaned, sanded, and refinished for reuse in DIY projects or another location.
However, inspect the boards carefully for any signs of damage, warping, or excessive wear that may affect their structural integrity or aesthetic appeal.
Always ensure the compatibility of the reused hardwood flooring with the new installation area, such as moisture levels and subfloor compatibility.
Proper cleaning, storage, and preparation are essential to ensure the reused hardwood flooring is in its best possible condition for future use.
How long does it take to remove glued-down hardwood floors?
The time it takes to remove glued-down hardwood floors can vary depending on the size of the area to be removed, the type of adhesive used, the condition of the subfloor, and the tools and techniques employed during the removal process.
Typically, it can take several hours to a full day for a moderately sized room. However, larger areas or more intricate installations may require more time and effort.
If the hardwood flooring was installed using a strong adhesive, it may take longer to remove because the adhesive may have a stronger bond.
Additionally, if the subfloor is in poor condition, removing the hardwood flooring may require more time as the subfloor may need repair or replacement.
The type of tools used in the removal process can also affect the duration. For example, using a floor scraper with a sharp blade can speed up the process compared to using a less effective tool.
Conquer Your Glued-Down Engineered Hardwood Flooring Removal
You now have the knowledge that removing glued-down engineered hardwood flooring is indeed possible, albeit a challenging task.
By following the steps outlined and using the necessary tools, you can successfully remove the flooring while minimizing damage to the subfloor.
Additionally, you understand the factors to consider when deciding whether to reuse the removed hardwood flooring and the time and effort required for the removal process.
Armed with this knowledge, you can approach the task with confidence and make informed decisions regarding your flooring projects.
With proper planning and execution, you’ll be able to achieve the desired results and transform your home space according to your preferences.