Last Updated on December 6, 2022
OSB or oriented strand board is a durable alternative to plywood. They are created by pressing strands of wood together with a resin. They are very sturdy and pliable. Without proper sealing, it can be prone to moisture damage.
Most people don’t know that OSB needs to be waterproofed and sealed before being used outdoors. If you intend to use them for construction, you must understand how to seal OSB flooring to add additional moisture protection.
Even with the waterproofing that the manufacturer applies, you may want to take precautionary steps to ensure the longevity of your flooring. Sealing this board will enable you to extend the life of your OSB panels and assure the success of your project.
This article aims to show you the steps involved in protecting OSB flooring by using the correct materials easily.
How to Seal OSB Flooring: Simple DIY Guide

OSB is a type of engineered wood made from pieces of wood that are glued and pressed together. It is a popular choice for flooring because it is strong and durable.
However, it is also porous, absorbing moisture from the air. This can cause the OSB to swell and warp, making it challenging to install flooring over it. It is necessary to seal the OSB with a waterproof sealer to prevent this.
Here are the steps you must follow to know how to seal OSB subfloor:
Step 01. Sand the Surface:
Sanding the surface of the OSB is an essential step in the sealing process. Sanding smooths out the surface and gives the sealant a smooth surface to adhere to. It also helps remove any particles that could interfere with the sealant’s ability to adhere to the OSB.
Sanding can be done by hand or with a power sander. If you are sanding by hand, use 120 to 220 fine-grit sandpaper and sand in the direction of the grain. Using a power sander, start with 40 to 50 coarse-grit sandpaper and gradually move to a finer grit.
Step 02. Vacuum Up the Dust:
Vacuuming up the dust is a critical step in sealing OSB flooring. The first thing to do is make sure that the area is clear of debris. Once your space is clean, use a vacuum cleaner with attachments to get into all the nooks and crannies.
Vacuum the entire area, paying special attention to the corners and edges. After vacuuming the surface, Use a damp cloth to wipe down the surface. This will help remove any residual dust that may have been left behind.
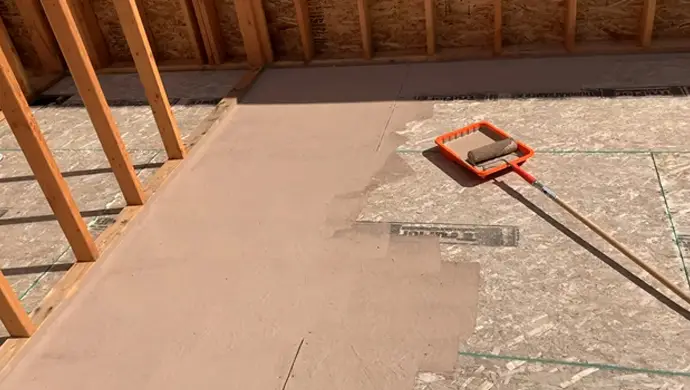
Step 03. Apply a Generous Amount of Sealer:
The OSB will soak up a lot of the sealer, so it is important to make sure that you use a sufficient quantity. Apply it evenly, making sure to get into every crevice and nook. Once you’ve applied the sealer, let it sit for a couple of hours so that it can soak in and dry properly.
You don’t want to walk on it while still wet, as this could cause streaks or marks. When it’s dry, the OSB flooring will be protected from moisture. It’ll also be easier to clean, as the sealer will provide protection against dirt and grime.
Step 04. Be Sure to Work in Small Segments:
Working in small segments is an effective way to seal your OSB flooring. As a result, you do not miss any areas and seal the floor adequately. It is also important to apply the sealant in small portions to allow the sealant to dry properly before moving on to the next section.
Once you have sealed one section, move on to the next and continue until the entire floor is complete. Be sure each segment is ventilated before beginning work.
Step 05. Allow the Sealer to Dry:
Don’t forget to allow the sealing fluid to dry completely before continuing. This will usually take several hours (up to 24 hours), depending on the temperature and humidity levels. Once the sealer is dry, you can apply a second coat if desired. Let the second coat dry well before walking on it or using it. Failure to do so could result in damaging the finish.
OSB flooring is an excellent option for a durable, low-maintenance surface. When properly sealed, it can withstand years of wear and tear. You can prolong the lifespan of your OSB material by following these simple steps, and it will look great for longer.
Tips for Sealing OSB Flooring Successfully

Anyone who has ever worked with OSB (oriented strand board) knows that it can be a bit of a tricky material to work with. It’s essential to take the time to seal it properly before use to prevent any moisture damage.
Here are a few tips to help you achieve success:
01. The board should be clean and dry: To seal OSB flooring, ensure that the board is thoroughly cleaned. Any dirt, dust, or debris on the board’s surface will create a barrier that will prevent the sealer from bonding properly. An easy way to clean the board is with a vacuum fitted with a soft brush attachment.
02. Eliminate all the moisture: Before sealing your OSB flooring, it is essential to eliminate all moisture from the surface. The best solution to do this is to use a wet/dry vacuum. Start vacuuming loose dirt and debris, then vacuum up any remaining water.
03. Apply a primer before sealing: Apply a primer to your OSB floor before coating it. Sealing works best when the OSB is clean and dry. Apply a coat of primer to the OSB with a brush or roller designed for use with sealers.
Apply the primer in long, even strokes, working in small sections at a time. Let the primer dry completely before proceeding to the next step. You may need to apply a second coat of primer if the first coat does not provide even coverage.
04. Use a compatible sealant: Always try to use an agreeing sealant when sealing OSB flooring. The adhesive should be designed explicitly with OSB, not just any old sealant. It’s also important to choose a sealant compatible with the type of finish you’re using on your OSB floor.
05. Don’t apply sealant under direct sunlight: When working with sealant, direct sunlight can cause it to dry too quickly. This can lead to several problems, including an uneven surface, white patches, and, ultimately premature wear. Apply your sealant in the early morning or evening when the sun isn’t as intense.
06. Brush away any excess sealant: Once you have applied the sealant evenly across the exterior of the OSB flooring, it is important to remove the excess sealant with a brush. This will help ensure that the sealant dries evenly and that there is no build-up of sealant around the flooring edges.
07. Test a small area first: Whenever sealing OSB flooring, it is advisable to perform a test on a sample area first. This will help you avoid any potential problems and see how the sealant looks and feels.
Benefits of Using OSB Panel in Flooring

OSB boards are versatile materials that can be used for various purposes, including flooring. Although this material is not as commonly used as plywood, it has many benefits that make it a great choice for a variety of applications:
01. Inexpensive: OSB panels are an inexpensive option for flooring. They are also easy to install and can be cut to size using a standard saw. In addition, OSB pieces are durable and will not dent or scratch easily.
02. Easy to work with: Are you planning to do a little work around the house this weekend? If so, you may be considering what type of flooring to use. If you’re looking for an option with a lot of flexibility, you may want to consider using OSB paneling. This is also easy to cut and install, making it an extremely viable choice for do-it-yourselfers.
03. Durable: One of the most significant benefits of this board is its durability. It will last a long time and will not show effect as quickly as other materials. It is also resistant to moisture, so it is ideal for use in areas where there is a risk of water damage.
04. Lightweight: OSB subfloor panels are much lighter in weight, making them easier to work with during the construction process. They can be cut to fit any space. Overall, OSB paneling is a viable option for those seeking a strong, lightweight material that is easy to work with.
05. Versatile: This board is a versatile material suitable for various applications, like flooring, subflooring, kitchen flooring, etc. These panes can be used in multiple settings, including both residential and commercial properties.
06. Eco-friendly: OSB wood flooring attracts a lot of interest since it is Eco-friendly. The manufacturing process of OSB wood panels uses less energy than other types of flooring, such as carpet or tile.
In addition, the OSB wood is made from renewable resources, such as wood chips and sawdust. As a result, it has a lower carbon footprint compared to other varieties of flooring.
FAQs
Let’s take a look at some frequently asked questions about OSB flooring to help you learn more about this material:
Q. Can I Use OSB Paneling in My Shower?
No, you cannot. OSB wood panels are not waterproof and require a special coating to be used in wet areas. This is why OSB sheeting is not recommended for use in showers.
Q. Can I Install OSB Paneling Over Existing Flooring?
Yes, you can install OSB boards over existing flooring as a subfloor. This flooring is a good choice for a subfloor because it’s strong and durable and absorbs sound well.
Q: Can You Use OSB Instead of Plywood?
Yes, it is possible to substitute OSB for plywood. They have equivalent characteristics and can be interchangeably used in most cases. OSB is usually a bit cheaper, so it might be a good option if you’re on a budget.
Q: Is the OSB Board Toxic?
No, OSB is not toxic. It is made of wood products and adhesives, safe to use in homes and around children and pets.
Conclusion
Anyone who has ever stepped on a loose floorboard will know just how dangerous an uneven floor can be. This is where sealing comes in. Sealing your OSB planks is a wonderful way to make sure it is level and even, and it also protects the boards from moisture damage.
Sealing OSB floors is an easy and effective solution for homeowners who wish to enhance their home’s safety. A smoother floor will create a longer lifespan for the boards and make them smoother.
Therefore this article on how to seal OSB flooring might be just what you need. It is an easy process to seal OSB floorboards that can be done in a few hours. All you need is a sealant and some basic knowledge.
Recommended Article To Read: