Last Updated on December 1, 2022
Air vents play an essential role in both the cooling and heating of a building. In the summer, they allow cool air to circulate throughout the space, and in the winter, they allow warm air to do the same.
If you have an air vent that is clogged or damaged, it can impact the efficiency of your HVAC system and lead to higher energy bills. That’s why it’s important to know how to remove air vent from wall, so you can properly clean or repair it as needed.
Essential Tools and Materials
Listed below are the tools you will need to remove the air vent, along with the materials you will need:
- Screwdriver
- Drill
- Measuring tape
- Level
- Chisel
- Hammer
- Putty knife
- Trowel
How to Remove Air Vent from Wall: Step-by-Step Guide

There is no special skill or talent required to take out an air vent from a wall, but patience and time are required for the process. Follow the steps below to remove your air vent properly:
1. Unplug or Turn off the Power:
Before you do anything, make sure to unplug the power source or turn off the electricity to the area where you’ll be working. This will prevent any accidents from happening while you’re working.
2. Remove the Screws:
Once the power is off, use a screwdriver to remove the screws that are holding the air vent in place. If the screws are painted over or hard to remove, you might need to drill them out.
3. Measure the Area:
After the screws are removed, take a measurement of the area where the air vent is located. It will be easier for you to determine the amount of wallboard or plaster you’ll need to remove if you know the quantity.
4. Remove the Wallboard or Plaster:
Use a chisel and hammer to remove the wallboard or plaster around the air vent. Start by making a small hole in the wall and then widening it until the entire area surrounding the vent is uncovered.
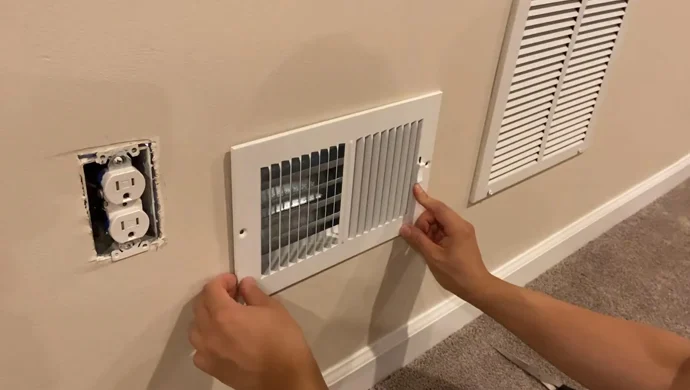
5. Remove the Air Vent:
As soon as you have exposed the area around the vent, you should be able to pull it out of the wall with little difficulty. If it’s difficult to remove, you should use a putty knife or trowel to help pry it loose.
6. Clean up the Area:
It is essential that the hole in the wall be patched after the vent is removed. Use joint compound or plaster to fill in the hole, and then sand it down until it’s flush with the rest of the wall.
7. Replace the Vent:
If you’re replacing the air vent, simply measure the hole in the wall and cut a new piece of venting to fit. Secure it in place with screws, and then plug or turn on the power to the area.
These are the basic steps for removing an air vent from a wall. Remember to take your time, be careful while working, and always follow the manufacturer’s instructions when installing a new air vent.
Reasons for Replacing an Air Vent

Most people don’t think about their home’s air vents until there’s something wrong with them. And while it’s true that air vents do sometimes need to be replaced, there are also a few good reasons to replace them preemptively, including:
1. Damage:
If the air vent is damaged, it may need to be replaced. This can be due to physical damage, like someone hitting it with a vacuum cleaner or water damage from a leaky roof.
2. Clogs:
Over time, air vents can become clogged with dust and debris. In turn, this can affect your home’s airflow and raise your energy bills. If you notice that your air vents are starting to get clogged, cleaning them out or replacing them altogether is a good idea.
3. Upgrades:
You may be required to change the air vents in your home if you are upgrading your HVAC system. This is because new vents may be a different size or shape than the old ones.
4. Change of Use:
If you’re changing the way you use your home, you have to replace the air vents. For example, in order to convert a bedroom into an office, you need to install new vents to accommodate the change.
5. Aesthetics:
In some cases, you may simply want to replace the air vents in your home for aesthetic reasons. This could be because you’re redecorating or because you want to change the look of your home.
No matter what your reason is for replacing an air vent, the process is relatively simple. Just follow the steps above, and you’ll have your new vent installed in no time.
Consequences of Not Replacing a Damaged Air Vent

In the case that you do not replace the air vent, there are several adverse consequences that can arise, including:
1. Poor Airflow:
One of the most common problems associated with failure to replace an air vent is poor air flow. This can happen if the vents are clogged or if they’re the wrong size for the room. As a result, your home may not be heated or cooled properly, and you may see an increase in your energy bills.
2. Water Damage:
If you keep an air vent that needs replacing, you will also experience water damage. A leaky vent or one that has been damaged by a storm can make the vent collapse. Water damage can lead to mold and mildew, which can be a health hazard. It can also damage your walls, floors, and furnishings.
3. Pest Infestation:
Among the potential consequences of failing to replace an air vent is the possibility of pest infestations. There is a probability that your vents may be improperly sealed, which may result in the entry of pests. Once they’re in, they can reproduce and cause an infestation.
4. Fire Hazard:
A fire hazard is another potential consequence of not replacing an air vent. This is because vents can become clogged with lint and other debris. There is a potential for this to lead to a blockage of the airflow and a fire to result.
5. Carbon Monoxide Poisoning:
It is also possible to become poisoned by carbon monoxide if you fail to replace an air vent. As a result of blocked vents, carbon monoxide can build up in your home. Carbon monoxide is a colorless, odorless gas that can be fatal if inhaled.
These are just a few of the consequences that can happen if you don’t replace an air vent.
FAQ’s
Can You Cover Up Wall Vents?
In many cases, you can cover up wall vents, but it is not recommended. Since it can impact the airflow in your home, it can lead to problems like poor heating and cooling, increased energy bills, and pest infestations.
How Often Should You Replace Air Vents?
There is no set timeframe for how often you should replace air vents. However, it’s good to inspect them regularly for signs of damage or wear and tear. If you notice any problems, it’s best to replace the vent as soon as possible.
What Are the Different Types of Air Vents?
There are several different types of air vents, including Floor Vents, Ceiling Vents, Wall Vents, and Baseboard Vents. Each type of vent has its own benefits and drawbacks, so choosing the right one for your home is important.
Conclusion
With the knowledge that you now have about how to replace an air vent and the consequences of not replacing one, you can be sure that your home is safe and comfortable. You must inspect your vents on a regular basis and replace them if necessary in order to avoid any problems.
You Can Also Read:
- What causes cats to scratch walls?
- The Best Way to Remove Shelves from Walls
- What is the lifespan of a wall heater?
- Is it possible to decorate a wall with skis?