Last Updated on November 2, 2022
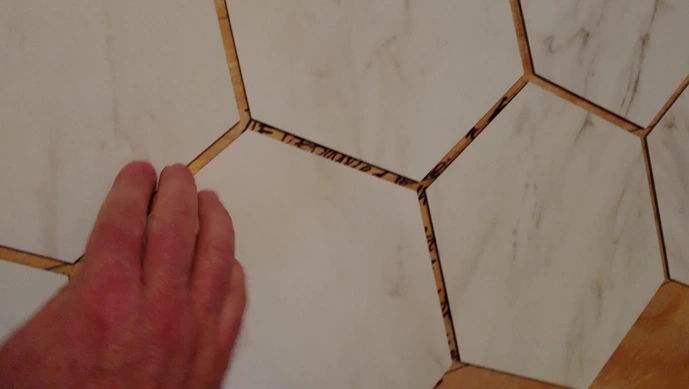
Have you ever noticed that there are often gaps along the edges when you lay down peel-and-stick tile? This can happen for several reasons, such as the tiles not being laid evenly or the adhesive not bonding properly. Whatever the cause, peel-and-stick tile gaps can be unsightly and may even be a tripping hazard.
Not only is this unsightly, but it can also cause the tiles to come loose over time. So filling the gaps in your peel-and-stick tile is important because it helps to create a smooth surface that is easy to clean. Besides that, it stops water from seeping through the cracks and damaging the adhesive. But how to fill in gaps in peel and stick tile?
You can use a caulk that matches the color of your peel-and-stick tile, or you can use clear caulk. In the following section, we will cover everything you need to know about filling your peel-and-stick tile gaps, including the tools you need and the steps to follow.
How to Fill In Gaps In Peel and Stick Tile Systematically?

The first step in creating a professional-looking backsplash or wall tiling is to fill the gaps. While it may seem daunting, with a little patience and planning, filling in the gaps between tiles is not difficult. But, to achieve a professional result, you must follow a systematic approach.
To get started, you’ll need some tools, including:
- A putty knife
- A straightedge
- Painter’s tape
- Caulk tube (color-matched or clear)
- A caulk gun (optional)
- A clean, lint-free rag
The following steps will help you fill in peel-and-stick tile gaps once you’ve got the tools:
Step 1: Prep the Area
The first step is to prep the area where you will be caulking. This will help ensure that your new backsplash will look its best and last for years to come. To prepare the area, start by removing all rubbish, such as dirt particles, from the gaps and joints. You can use the putty knife to scrape off any loose caulk or trash that is already inside the gap.
Next, use a level to make sure that the surface is even. If there are any indentations or bumps, use a self-leveling compound to fill them in. Then you can use painter’s tape to create straight lines along the edges of your backsplash. This will help you achieve neat, clean lines when caulking.
Step 2: Cut the Tip of the Caulk Tube
Once you have prepped the area, it is time to cut the caulk tube’s tip. A 45-degree angle will be best for cutting the tip. Caulk will be applied more evenly this way. Just be sure not to cut the tip too big, as this will make it difficult to control the caulk.
If you are using a caulk gun, you can skip this step. Just be sure to puncture the inner seal of the caulk tube before inserting it into the gun.
Step 3: Apply the Caulk
Now it’s time to apply the caulk. Before starting, read the caulking tube’s directions carefully. Caulk will need to be applied in the correct amount and dried after a certain amount of time. You want to start in one corner and then run the caulk along the length of the gap.
As you go, try to keep the caulk tube at a 45-degree angle so that the caulk is evenly applied. When using a caulk gun, apply gentle pressure on the trigger of the gun to dispense the caulk into the gap.
Step 4: Smooth Out the Caulk
After you’ve applied the caulk, you’ll need to smooth it out with a caulking tool. The best way to do this is to start in the middle of the gap and work your way out toward the edges. Use a light touch and be careful not to apply too much pressure, or you may end up with a messy, uneven caulking job.
Once you’ve reached the edges, use the putty knife to remove all excess caulk. You can also use the putty knife to smooth out any imperfections in the caulking job. If the caulk has come into contact with the tile, make sure to wipe it away.
Step 5: Let the caulk dry
Once you’ve filled in all the gaps with caulk, it’s important to let it dry completely before moving on. Otherwise, the caulk won’t be effective and could cause problems down the road. The best way to allow the caulk to dry is to leave it alone for at least 24 hours.
During this time, don’t touch or disturb the caulking in any way. Once the 24 hours have passed, you can then proceed with your backsplash or tiling project. Once the caulk is dry, you can remove the painter’s tape.
Why Does Peel and Stick Tile Have Gaps?

Most people choose peel-and-stick tile for its easy installation process. Unlike traditional ceramic tile, which requires mortar, grout, and other supplies, peel-and-stick tile can be applied directly to a surface with little effort. There have been reports that peel-and-stick tiles don’t lay flat, resulting in unsightly gaps between the tiles.
There are a few possible reasons for this. Here are a few of the most common:
The Surface Isn’t Completely Level: When you apply tile to a surface that isn’t level, the tiles won’t lay flat. This is often the case with older homes, where floors can settle and create uneven surfaces. In these cases, it’s best to level the surface initially before applying the tile.
The Tile Isn’t Cut Correctly: Without correct cuts, it can cause gaps between the vinyl tiles. This is why it’s important to measure the area you’re tiling and to use a sharp utility knife to make clean, straight cuts. Also, be sure to follow the manufacturer’s instructions carefully. Some tile needs to be trimmed before they can be applied, while others can be applied as is.
There’s Too Much Adhesive: If the back of the tile has too much adhesive to stick vinyl, the tile can lift up and cause gaps. Following the manufacturer’s instructions carefully will help you avoid this. Most peel-and-stick tile comes with an adhesive backing that needs to be peeled away before installation. If you don’t remove this backing, the tile won’t lay flat.
The Room Is Too Humid: If the room you’re tiling is too humid, the adhesive on the back of the tile can become less effective, causing the tile to lift up at the edges and create gaps. To avoid this, be sure to install the tile in a well-ventilated room and use a dehumidifier if necessary.
What Is the Lifespan of Peel-And-Stick Floor Tiles?
Peel and stick floor tiles are a popular choice for many homeowners due to their easy installation and durability. Most types of vinyl tiles will last between 5 to 25 years, depending on the quality of the product, how well it was installed, and the amount of foot traffic the floor receives.
With proper care and maintenance, vinyl floor tiles can last many years. But if they are not properly cared for, they may begin to show wear and tear more quickly. If you would like your peel-and-stick floor tile to last longer, keep them clean by sweeping or vacuuming regularly.
You should also mop them with a mild cleaning solution occasionally. Also, checking the gaps between the vinyl tiles regularly and resealing them as needed can also help to prolong their lifespan.
Are Liquid Nails Suitable for Peel-And-Stick Flooring Gaps?

Many people assume that liquid nails are suitable for all types of adhesive needs, but this is not always the case. While liquid nails can be an effective adhesive for some materials, they are not always the best choice for others. For instance, liquid nails should not be used on vinyl floors.
This is because liquid nails are designed to hold materials such as wainscoting, cabinetry, and baseboards in place, not to provide a permanent bond for flooring. Over time, the adhesive can become dry and cracked, which can damage the vinyl. It can be a good temporary solution to hold the vinyl flooring in place until a more permanent solution is found.
If you choose to use liquid nails, apply them sparingly and only to the areas where the gap is most pronounced. So, if you’re looking for a long-lasting adhesive for stick vinyl floor tile, liquid nails are not the best option. Instead, opt for a product that is specifically designed for this purpose.
Can You Put Grout Between Peel and Stick Tile Gaps?
If you’re looking for a more permanent solution to filling in the gaps, the grout may be a good option. To fill in spaces between tiles, grout is used as a type of mortar. It is available in a variety of colors to match your vinyl tile. Applying grout is relatively simple. Start by caulking the perimeter of the area you wish to grout.
This will help to create a barrier so that the grout doesn’t spread beyond where you want it. The grout should then be mixed according to the manufacturer’s instructions. Using a putty knife or other tool, apply it into the gaps between the tiles once it has been mixed. Be sure to wipe away any excess grout before it dries. Before using the area, allow the grout to dry completely.
Is It Worth It to Fill In Gaps In Peel-And-Stick Tiles?
Whether or not you should fill the tile’s gaps depends on a few factors. Consider how visible the gaps are. If they are small and not very noticeable, you may not need to worry about filling them in.
But if the gaps are large and pronounced, the wastes may accumulate in them. In this case, it probably makes sense to fill them in. The length of time you intend to keep the tiles is another consideration. Filling in the gaps may not be worth the effort if you plan on replacing them soon.
Filling in the gaps can help extend the life of tiles if you plan to keep them for a long time. Also, some flooring types tend to have more gaps than others. For instance, tile floors are more likely to have pronounced gaps than laminate or vinyl floors. So, if you have vinyl tile floors and are concerned about the gaps, it is probably worth it to fill them in.
Now you know how to fill in gaps in peel and stick tile. With a little effort, you can prolong the life of your floors and keep them looking their best.