Last Updated on December 1, 2022
If your cat has been scratching your walls, you’re not alone. It’s estimated that more than 85% of cats will scratch furniture or walls at some point in their lives.
While this natural behavior can be frustrating, there are way to fixing cat scratches on walls and keep both your feline friend and your home looking good. With a little patience and the right products, you can put an end to your cat’s wall scratching once and for all.
This guide will teach you how to fix cat scratches on wall in its entirety if you have a cat that scratches your wall.
What are The Causes of Cat Scratching Walls?
There are several reasons why cats scratch walls. First, scratching is a natural behavior for cats. It helps them to stretch their muscles and sharpen their claws.
Second, cats may scratch walls as a way of marking their territory. By leaving behind their scent and visual marks, they can let other animals know that this is their space.
Finally, some cats may scratch out of boredom or frustration. If they don’t have access to proper scratching materials, they may turn to your walls as an alternative
Steps on How to Fix a Cat Scratch on Your Wall

No one knows how it happens. You turn your back for two seconds, and the next thing you know, there’s a scratch on your wall. And not just any scratch – a claw mark from your cat.
If you’re looking for ways how to fix a cat scratch on wall, you’ve come to the right place. Here are a few simple steps:
Step 1: Inspect the Scratch
The first step is to take a close look at the scratch. If it’s a superficial scratch, you may be able to fix it with a little elbow grease. However, if the scratch is deep or when the paint has been ripped off by your cat, you will need to take more drastic measures.
Step 2: Gather Your Supplies
Once you’ve determined the severity of the scratch, it’s time to gather your supplies. You’ll need a mild cleaner and a soft cloth for superficial scratches. For deeper scratches, you’ll need putty or spackle, sandpaper, primer, and paint.
Step 3: Clean the Area
If you’re dealing with a superficial scratch, start by cleaning the area with a mild cleaner. This will remove any dirt or debris that could prevent the repair from adhering properly.
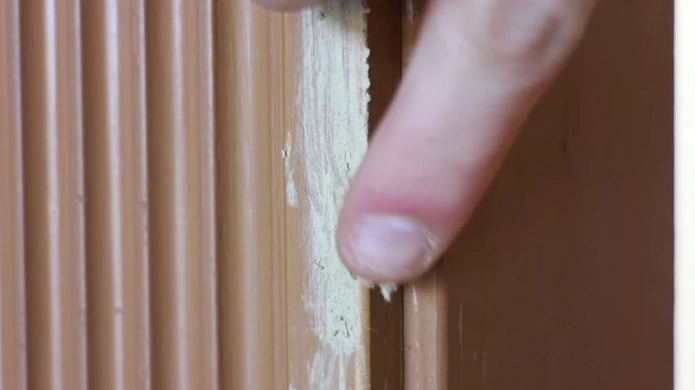
Step 4: Apply the Putty or Spackle
If the scratch is deeper, you’ll need to apply putty or spackle to fill in the void. Simply apply them with a putty knife or your finger.
Step 5: Let it Dry
Once you’ve applied the putty or spackle, let it dry completely. This may take anywhere from a few hours to a few days, depending on the product you’re using.
Step 6: Sand the Area
Once the putty or spackle has dried, sand the area until it’s smooth. This step is important as it will help the repair blend in with the rest of the wall.
Step 7: Apply Primer
After you’ve sanded the area, apply primer to help the paint adhere properly. It’s important to use a primer that’s specifically designed for walls; otherwise, you may end up with a patchy repair.
Step 8: Paint the Area
Finally, cover the area in paint with a color that closely matches your wall. Allow the paint to dry completely before putting anything back in place.
You can fix cat scratch on the wall with these simple steps and keep your home looking great.
Tips for Preventing Future Cat Scratches on Walls

While it’s impossible to prevent your cat from scratching your walls completely, there are a few things you can do to minimize the damage..
First, provide your cat with plenty of scratching materials. This includes scratchers, climbing trees, and even cardboard boxes. By giving your cat an acceptable place to scratch, you can dissuade them from going after your walls.
It would be best if you also tried to keep your cat’s nails trimmed. This will help minimize the damage they can do if they do scratch your walls. You can trim your cat’s nails at home or take them to a groomer.
Finally, try using double-sided tape or other physical deterrents in places where you don’t want your cat to scratch. This won’t stop them from scratching altogether, but it can help keep them from damaging your walls.
What do you do If Your Painted Walls Have Cat Scratches?
It’s okay if your painted walls get scratched. While it may seem like a daunting task, repairing the damage can be surprisingly easy.
It is important to assess the damage first. If the scratches are superficial, they can often be fixed with a simple touch-up.
However, deeper scratches will require more extensive repairs. Once you have assessed the damage, you can begin to repair it. The area around superficial scratches should be cleaned with a mild detergent.
Next, apply a touch-up pen or paint to the area. If necessary, you can use a small brush to blend the paint until it matches the surrounding wall.
For deeper scratches, start by using a putty knife to fill in any chips or cracks in the wall. Once the area is smooth, apply a layer of primer before painting over it with your chosen color. Your walls will look as good as new with a rare time and effort.
Common Mistakes When Repairing Cat Scratches on Walls
Cat owners are all too familiar with the telltale signs of their feline friend’s mischief: scratches on walls, furniture, and doors. While it’s natural for cats to scratch, it can be frustrating for pet parents to deal with the damage constantly.
If you’re looking to repair your cat’s scratches, here are a few mistakes to avoid:
One common mistake is using traditional paint to cover scratches. Paint may cover the damage temporarily, but it’s not a durable solution. Cat scratches are usually deeper than the paint can fix, so the scratches will eventually reappear.
Plus, the paint job will likely be noticeable and won’t match the rest of your wall. A better option is to use a wall repair kit specifically designed for repairing cat scratches.
These kits come with putty that can be used to fill in the scratches, and they also include a textured sticker that simulates the look and feel of real wallpaper.
Another mistake to avoid is sanding down the scratch too much. When you sand too deeply, you risk damaging the drywall beneath the surface. This can make the scratch worse and also create a bigger repair job.
If you do need to sand down the scratch, be sure to only sand the area around the scratch, not the entire wall. Once you’ve repaired the scratch, make sure you prime and paint over the area to protect it from future damage.
Finally, avoid using harsh chemicals or cleaners on your walls. These can damage the paint or finish on your walls and make the scratches more difficult to repair. If you must use a cleaner, be sure to test it in an inconspicuous area first.
Whenever you repair cat scratches on your walls, you can avoid common mistakes by following these tips. It is very simple to restore an old wall to look new again by using the right tools and materials.
Final Thoughts
No matter how well you train your cat, there’s always a chance they’ll scratch up your walls. Even though dealing with damage can be frustrating, it’s important to remember that it can be repaired.
With a little time and effort, you can make your walls look good as new. Just be sure to avoid common mistakes, like using paint to cover up the damage or sanding too deeply.
Using these tips, you can repair your cat’s scratches quickly and easily. We hope this guide was helpful. If you have any questions or comments, please feel free to reach out to us. We’re always happy to help. Thanks for reading.
Topics that Interest You:
- What you need to do to fix the gap between the backsplash and the wall?
- Is it possible to use skis as wall decor?