Last Updated on July 10, 2023
Tile removal from a fireplace can be quite a challenge. Depending on the age and type of tile, it might not be possible to remove it without damaging the fireplace. If the tiles are glued to the fireplace, chipping or breaking them away could destroy the surrounding brickwork. So it’s essential to remove the tile carefully and avoid damaging the fireplace.
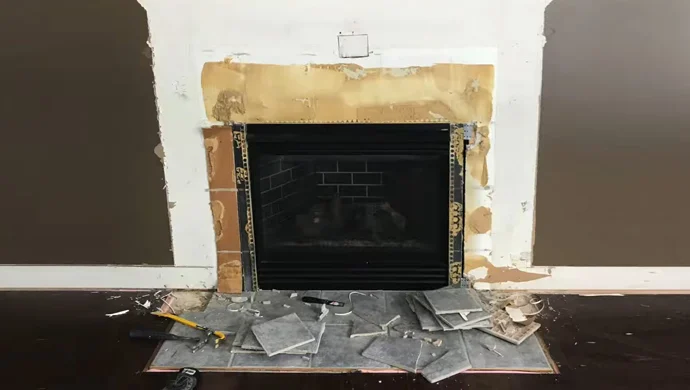
The following steps will show you how to safely remove tile from a fireplace. We’ll also discuss some of the potential problems you might face and how to mitigate them. The following information may be helpful to you if you are considering removing old tiles from your fireplace.
How to Remove Tile From Fireplace Safely and Easily

It is essential to take your time when removing tiles from a fireplace. Depending on what kind of tile you have and the adhesive used, it might be challenging to remove the tile without damaging the surrounding brickwork. You must take the time to do this job properly, so you don’t damage your fireplace. Make sure to follow these steps carefully:
Check the Type of Tile and Adhesive
The appropriate tools and techniques make removing and replacing cracked or chipped tiles relatively simple. The first step is figuring out what kind of tile and adhesive you’re using. This will determine what type of tool you will need to use to remove the tile.
For example, if the tile is made of ceramic or porcelain, you must use a hammer and chisel to remove it. In the case of natural stone tiles, you must use a diamond blade saw. Once you have determined your tile type and type of adhesive, you can proceed with the removal. Be sure to work slowly and carefully to avoid damaging the underlying surface.
Score the Grout Lines with a Utility Knife
The task is even more challenging if the tile is set in grout. The right tools and patience can allow you to safely remove fireplace tiles. With the help of a utility knife, you will be able to score the grout lines in order to begin.
By doing so, it will be easier for you to break up the grout and make it easier to remove. The tile surrounds will also be protected, preventing damage to them.
Loosen the Tiles with a Hammer and Chisel

The next step is hammering and chiseling the tiles lose after you have marked the grout lines with the utility knife. This process will require you to use a cold chisel and a ball peen hammer in order to complete it. Start by placing the chisel on the grout line and hitting it with the hammer.
It may take you a few taps in order to get started. Once you have started, you can use a back and forth motion to loosen the tile. Work your way around the fireplace until all of the tiles are loosened. It is also essential to take extra precautions to ensure that the nearby brickwork is not damaged.
Put a Putty Knife under the Tile to Release It
Once the tile has been loosened by hammering and chiseling, you can use a putty knife to release it from the adhesive. Gently insert the putty knife under the edge of the tile and apply pressure. The tile should pop right off. If it does not, continue to work the putty knife around the perimeter until it releases.
Pry the Tiles Off With a Putty Knife
In the next step, you need to pry up on the tile gently, so it comes loose from the fireplace. You may need to use a little force, but be careful not to damage the underlying mortar or bricks. Once the first tile is off, work around the rest of the fireplace, prying each tile up until they’re all removed.
If you find that the tiles are stubborn and won’t budge, you can try heating them with a hair dryer or heat gun. This will help loosen the adhesive and make them easier to remove. Just be careful not to overheat the tiles, as this could damage them.
Remove Any Residual Adhesive

Once you’ve pried the tiles off of the fireplace, you may notice that there is still some adhesive residue left behind. This can be difficult to remove, but it’s important to ensure the surface is clean before you begin tiling again.
There are a few different ways to remove adhesive residue. Using a putty knife or scraper will work, or you can use a commercial adhesive remover. If you’re having trouble getting all the residues off, you can try using a heat gun to soften it.
Vacuum Any Debris from the Fireplace
Now that you have removed the tile from your fireplace, it is essential to vacuum any debris that may be left behind. This will help to prevent any potential damage to the fireplace itself. Vacuuming will also help remove any residual adhesive that may be present.
Once you have vacuumed the fireplace, you should wipe it down with a damp cloth. This will remove any final traces of debris and ensure that your fireplace is clean and ready for use.
Make Repairs to the Surrounding Area If Necessary
After removing the tile, you may notice some damage to the surrounding area. If the mortar or grout is crumbly or damaged, it will need to be repaired before you can continue. You can do this by using a putty knife to scrape out the old mortar or grout and then apply new mortar or grout as needed. Once the repair work is complete, you should thoroughly clean the area before moving on.
If the surrounding area is in good condition, you can begin prepping the area for the new tile. Start by cleaning the area thoroughly and then applying a layer of thin set mortar. Be sure to spread the mortar evenly and allow it to dry completely before proceeding. Once the thin set has dried, you can begin laying your new tile. Follow the manufacturer’s instructions for the best results.
Possibly a Good Match: What’s the best way to coordinate old and new tiles?
What Precautions to Take When Removing Tile From the Fireplace?

Before you begin to remove tile from your fireplace, there are a few things you need to consider before you begin the process. The following tips may be helpful:
Wear Gloves and Eye Protection
First, it’s essential to wear gloves to protect your hands from the sharp edges of the tiles. You should also wear eye protection to guard against any debris that could be generated by the removal process. It’s also a good idea to work in a well-ventilated area to minimize dust exposure.
Turn Off Any Power Sources before Working
Turning off all power sources before you begin work is one of the most important things you can do in order to prevent any damage. This includes shutting off the gas if you have a gas fireplace.
You’ll also want to ensure that there’s no electricity running to the fireplace. Once you’ve turned off all the power sources, you can remove the tile. Be careful when removing the tile, so you don’t damage the underlying structure.
Protect Nearby Surfaces with Drop Cloths or Tape
It is important to protect nearby surfaces when you are removing tiles from the fireplace. This includes covering the floor with drop cloths or taping off areas you don’t want to get dirty. Taking these precautions will help to minimize the mess and make cleanup easier. Besides that, it will also protect your surfaces from any potential damage.
Work Slowly and Carefully
Every piece of work you do should be approached carefully and slowly. There is a risk of making a mistake or causing damage to the fireplace if you rush the process during installation. Therefore, you should take your time and work carefully when removing your fireplace tile to avoid causing any damage to the surface.
What is the Best Tool for Removing Tiles?
There are a number of different tools you can use to remove tiles from a fireplace. The most effective tool for the job is a heat gun. A heat gun will help to loosen the adhesive holding the tile in place and make removal much easier. The underlying surface will also be protected.
You can also use a putty knife or chisel if you don’t have a heat gun. It’s more likely that these tools will damage the surface beneath the tile. This is why you shouldn’t use them unless it’s an emergency. There are also specific tools that you will need, such as a chisel, hammer, utility knife, wet saw, and safety gear, such as a respirator, gloves, and eye protection.
How Hard is It to Remove Ceramic Tiles from Fireplace?
Ceramic tile is a beautiful and durable material that can add value to your home. If you’re thinking of removing ceramic tile from your fireplace, you may be wondering how hard it is to do so. The good news is that with the right tools and a little bit of patience, it’s not as difficult as you might think.
First, you’ll need to score the surface of the tile with a glass cutter or utility knife. This will help the tile to break apart more easily. Next, use a chisel and hammer to gently remove the tile from the fireplace. To avoid damaging the surrounding area, work slowly and carefully.
Is It Safe to Paint Ceramic Tiles around a Fireplace?
Ceramic tile is made from natural clay and minerals, which makes it durable and long-lasting. While ceramic tiles are durable, they may be susceptible to staining and fading over time. If you want to refresh the look of your fireplace, painting the ceramic tile is a great option.
Before painting, be sure to clean the tile surface to remove any dirt or grime. Once it is clean, you can then apply a primer specifically designed for ceramic tile. After the primer has dried, just apply a coat of paint. Be sure to use paint that is designed for use on ceramic tiles.
It is also important to note that painting ceramic tile will change the surface, making it more susceptible to scratches and chips. Therefore, it is crucial to be careful when using the fireplace after painting. You may want to avoid placing heavy objects on the tile or using harsh cleaners. Taking good care of your painted fireplace will ensure its longevity.
Topics of Interest: