Last Updated on November 12, 2022
Covering your metal door frames extends your home decoration on a different level. Using a casing, you can hide any imperfections on the body of the entrance that might be visible.
A well-designed casing will also add aesthetic value to a doorway by creating a pleasing transition between the finished wall surface and the door frame. It can provide a measure of protection for the wall surface around the door opening.
Unfortunately, like many homeowners, you may not know how to cover metal door frames. Here we discuss the process of attaching a metal covering to make a unique and stylish door. With patience and the right tools, fitting casing to metal door frames will be relatively straightforward.
How to Cover Metal Door Frames : Complete Guide in Steps
A metal door frame is usually made from stainless steel and aluminum and is usually enclosed by a metal casing. These enclosures are more durable and require less maintenance than other materials like wood and plastic.
You need to ensure the cover is securely attached, so it does not come loose over time. We are here to describe the process of adding metal door frame casings so that you can do it yourself without any trouble.
Step 01. Identify the Size of the Casing:
Door openings determine the size of the trim. For a standard door, the width will be the same as the hinge jamb. The casing should be attached to the door frame with screws or nails.
To estimate the size of a casing to attach to a metal door frame, start by measuring the width of the panel. Add 1/2 inch to that measurement. Measure the height of the door frame from top to bottom.
Add 1/4 inch according to your measurement. The total of these two measurements is the width and height of the enclosure you will need to attach to the metal door frame.
Determine the thickness of the casing by measuring the door frame’s thickness. It should be equal to or greater than the thickness of the metal door frame.
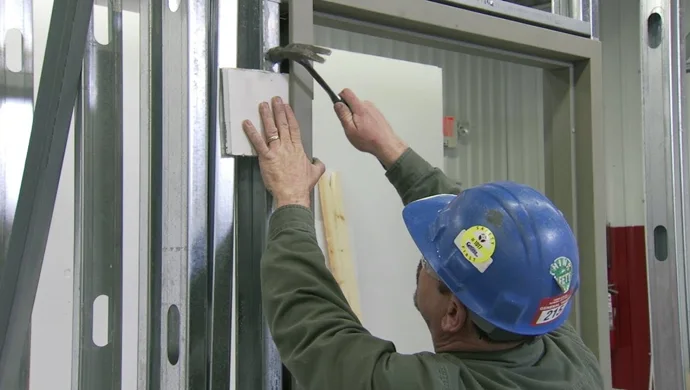
Step 02. Cut the Casing to Size Using a Saw:
Mark the desired length of the door frame casing on the saw blade. Position the blade at a 45-degree angle and cut along the marked line. Use a file or sandpaper to smooth any rough edges. Wear protective gloves when doing this.
Step 03. Make Pilot Holes into the Frame and Casing:
The number of holes needed will depend on the size and weight of the housing. But it is generally advisable to use at least four holes per side. Place the top of the casing against the door header, aligning the edges.
Mark the center of the top and bottom rail on the door casing. Then, place it on the door frame so that the marks you made align with the rails’ centers.
You’ll need a power drill, a drill bit slightly smaller than the screw you’re using, and a piece of masking tape. Mark the spot on the frame where you want to drill the hole with the tape. This will help to prevent the drill bit from slipping.
Choose the correct size drill bit for your project. Attach the bit to your drill and carefully position it on the surface of the metal. Put on a pair of safety goggles and hold the drill bit against the metal at a 90-degree angle.
Slowly apply pressure and start drilling. Once you’ve created a small divot in the metal, increase the speed of the drill and continue drilling until you’ve reached the desired depth.
Drill pilot holes through the casing and into the header. For side panels, place the end of the cover against the door jambs and drill. Remove the drill bit and clean up any debris.
Relevant Reading: Is it possible to fix a screw hole in a hollow metal door?
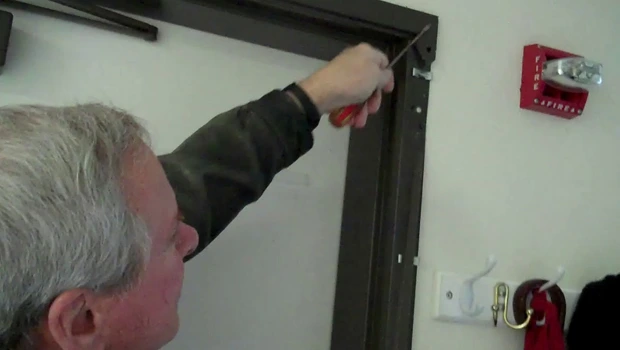
Step 4. Anchor the Casing to the Door Frame:
Choose the right anchors. The screws should be long enough to penetrate the door frame but not so long that they come out the other side.
Position the cladding against the door frame, ensuring it is level and flush with the surface. Use your screwdriver or impact driver to drive screws into the casing and door jamb.
Ensure that the screws are evenly spaced and tighten them until the casing is securely attached to the body. Be careful not to over-tighten the screws, as this can make it difficult to unscrew.
Start at the top of the aluminum or steel door frame and work your way down, making sure to drive the screws into the studs in the wall for added stability. Once the screws are in place, the next step is to add trim around the perimeter of the casing.
This will help to give the door a finished look and also help to seal any gaps between the enclosure and the door frame. Add a new doorknob and strike the plate to the door cover. You can spray paint or stain the casings to match your door or trim.
Types of Covers for Metal Door Frames

Metal door frames can be capped with a variety of materials, including metal, wood, and plastic. Each one comes with its own benefits and drawbacks.
Metal Casing:
Pros: Metal covers like steel or aluminum are strong and durable, rust-resistant, and able to withstand wear and tear for a long time. They are also low maintenance, as they do not require regular painting or other forms of upkeep.
These steel frame claddings can give a building a modern look. Metal casings are a popular choice for both commercial and buildings.
Cons: They can be more expensive than other materials and may require specialized installation tools. Metal enclosures can conduct heat, making them unsuitable for use in hot climates.
Wood Casing:
Pros: Wood casings are relatively easy to install and can be finished to match the surrounding trim. In addition, wood is an excellent insulator, helping to reduce energy costs. These covers can also be stained or painted to give them a unique look.
Cons: They’re not as durable as metal and may require more maintenance over time. Wood casings can provide a hiding place for pests or other unwanted guests. They are susceptible to rot and insect damage. On wood doors, they are usually used.
Plastic Casing:
Pros: Plastic casings provide a barrier against moisture and dirt, helping to keep the hollow metal door frames looking new for longer. They can also be used to add extra security features, such as tamper-resistant fasteners.
These covers come in a variety of colors and styles. So it is easy to find an option that will match your interior design aesthetic.
Cons: The casings are relatively difficult to install, and they may not provide as much protection against impact damage as thicker metal panels. Plastic is susceptible to melting down from extreme temperatures. They can degrade over time, becoming brittle and cracked.
FAQs:
Q: Can You Replace Metal Door Frames?

Yes, you can replace the existing frame. You will need to measure the door opening to get the right length. Then remove the old one by using a hammer or pry bar and install the replacement one.
Seal around the framed area with grout to prevent drafts. Check the door’s level and make any necessary adjustments. You can replace a metal door frame with a different material, such as wood or PVC.
Q: Are Metal Door Frames Structural?
Metal door frames are not structural, and they are often hidden behind layers of drywall, trim, and paint. But they are an important part of the door assembly. The panel provides support for the door panel and helps to distribute the weight of the door.
Q: How Do You Put Molding on a Steel Door?
Measure the metal door and cut the molding accordingly. Use a power drill to create pilot holes for the screws. Use a screwdriver to secure it in place. Caulk the seams and paint or color the molding to match the door. You can also use the right type of adhesive.
A good quality construction glue should be able to bond well to both the steel door and the molding. Use enough adhesive to create a strong bond. Once the adhesive has been applied, the molding can be put in place and held until it dries.
Q: How Do You Wrap a Metal Door?
Most metal doors have three hinges, one on each side and one in the middle. Once you have located them, you need to identify their tops and bottoms. The top rail is usually wider than the bottom rail and will have a lip extending over the edge of the door.
The bottom rail will be flush with the door edge. Start by loosening the screws that hold the top rail in place. Lift the top rail up and cross it over. Swing the door closed and tighten the screws on the bottom rail.
Conclusion:
Now you’ve figured out how to cover metal door frames. With a few simple tools, you can complete this project fairly easily. You will need patience since it takes about an hour to complete. But the final outcome is definitely worth it; your family or friends will be amazed by how good it looks.
Make sure the hole is the correct size. If the hole is too small or large, the anchor won’t be able to grip the metal properly and will just spin without going in. We hope this article has given you some helpful tips on joining a casing with a metal frame.
You Might Also Like: