Last Updated on July 10, 2023
Adding engineered hardwood to your tile flooring will simplify the process without going through a complete renovation. However, installing engineered hardwood over existing tiles is a common question among homeowners.
You can install engineered hardwood over tile as long as the tile is in good condition. However, remember that you must use prefinished engineered hardwood to install it over the tile. Also, the flooring must be glued or floated, depending on the manufacturer’s instructions.
Today we will discuss installing engineered hardwood over the tile and what to consider. We’ll also answer some common questions, such as whether to remove cracked tile before installation. So keep reading for detailed information.
How to Install Engineered Hardwood Over Tile?

Installing engineered hardwood on top of pre-existing tile can be a great solution to improve the appearance of your space. Before installing engineered wood over tile, you should evaluate the condition of the tile floor. Then follow these steps:
STEP 1. Evaluate the Tile Floor:
Evaluating the tile floor before proceeding with the installation process is crucial. Look closely at your tile flooring to ensure it’s in good condition.
Also, check for loose or broken tiles and repair or replace them if necessary. A level surface is essential for a successful installation. Any irregularities can cause issues later.
STEP 2. Acclimate the Engineered Hardwood:
To ensure a stable and long-lasting installation, acclimate the engineered hardwood planks to the room’s humidity and temperature. This process should be done for at least 3 days before installation, and it helps prevent potential future issues such as warping or buckling.
Let the planks sit on-site, and keep them open to adjust to the air’s moisture content and temperature. This allows the planks’ moisture content to match the room’s, which is essential for optimal performance.
STEP 3. Prepare the Room:
Thoroughly clean the tile floor before installation to ensure a smooth and successful transition to the engineered hardwood. Any dust, debris, or adhesive residue left on the tile floor can affect the adhesion of the hardwood and compromise its stability.
To prepare the room, remove any furniture, rugs, or obstacles that may hinder the installation. This will ensure that the installation goes smoothly and without any interruptions.
STEP 4. Measure and Plan:
Now measure the room’s dimensions and consider the height of the planks and door clearance to ensure a seamless fit. When measuring the room, account for any nooks or alcoves requiring additional planks.
Also, take note of any obstacles in the room, such as radiators or columns, that may require special cuts or adjustments to the flooring.
Once you’ve measured the room, it’s time to plan the layout of the planks. For a cohesive and visually appealing result, consider the direction of the planks and the placement of any seams.
STEP 5. Start with the Spacers:

Place spacers around the room’s perimeter before laying down the hardwood flooring over the tile. It creates the necessary gap for the natural stretching and contraction of the wood.
The spacers should be placed regularly, and the gap created should be at least 1/4 inch wide. Once the spacers are in place, you can lay down the flooring, starting from the center of the room and working your way outwards.
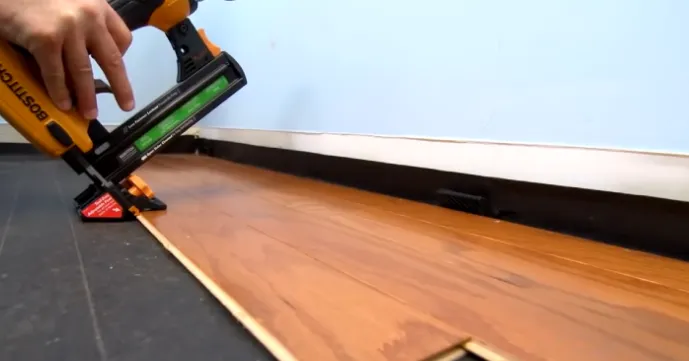
STEP 6. Lay the First Row:
Start by laying the first row of planks from the left corner of the room towards the right. Ensure they’re aligned properly with the tongue of one plank fitting into the groove of the previous plank.
The click-locking planks make installation easier, allowing you to secure them with a tapping block and rubber mallet. Use spacers to maintain the necessary expansion gap around the room’s perimeter.
STEP 7. Continue the Installation:
Now that you’ve laid the first row of planks and are transforming your space keep the joints staggered for a more pleasing look. When continuing the installation, use a saw or box cutter to make necessary cuts around doorways, corners, and obstacles to ensure the planks fit properly.
Also, remember to leave a gap of around 1/4 inch between the planks and any fixed objects, such as walls or cabinets. This will allow for the natural expansion and contraction of the flooring and prevent any buckling or warping.
STEP 8. Check for Levelness:
Use a level tool to check for levelness and adjust by adding or removing spacers. This is especially important if you’re installing engineered hardwood over tile. Even though tile is a relatively flat surface, it may still have slight variations in levelness that can cause problems down the line.
You can ensure that your hardwood flooring will go down smoothly by checking for levelness and adjusting as needed.
STEP 9. Complete the Installation:
Continue laying the engineered hardwood planks row by row until you reach the opposite side of the room. Make sure to stagger the joints between the planks for a more natural look and to ensure the planks interlock properly.
When you reach the end of the row, use a tapping block and a pull bar to connect the last plank in place. Repeat this process for each row until you have covered the entire floor.
STEP 10. Finishing Touches:
To add some final touches to your new flooring, take a step back and admire the beauty of your newly installed hardwood planks.
Once all the planks are in place, it’s time to remove the spacers and install any necessary transition pieces or thresholds to cover the gaps between the engineered hardwood and adjacent flooring surfaces.
Be sure to carefully measure and cut the transition pieces to fit snugly into the gaps and secure them with adhesive or nails.
What to Consider Before Installing Engineered Hardwood Over Tile?

Before laying engineered hardwood over tile, there are several factors you need to consider.
#1 Check the Existing Tile Quality:
First, ensure the tile’s in good shape and free from any cracks or damage before installing your new engineered hardwood. A damaged or uneven tile surface can cause problems with the installation, such as creaking, hollowness, and uneven planks.
Take the time to thoroughly inspect the existing tile quality to ensure a smooth and stable platform for your new flooring. Note that you should fill any existing grout lines with a suitable leveling compound to prevent any movement or shifting of the new hardwood planks.
#2 Determine the Wood-Planks Height:
Remember to consider the height of your engineered hardwood planks. Using the recommended thickness will ensure a seamless transition with your existing flooring.
To determine the planks’ height, measure the thickness of your tile and add ⅜ inch (0.95 cm) to the engineered hardwood. This will give you the total height of your new flooring.
If the height difference between the two floors is too great, you may need to remove the tile or add a subfloor to raise the height. Make sure that the final height of your new flooring is level with adjacent floors to avoid tripping hazards and unsightly gaps.
#3 Assess the Tile Surface Condition:
Now that you’ve determined the height of your planks, it’s time to assess the condition of the tile surface. Ensure the tile surface is clean, level, and debris-free. Filling in grout lines is also advisable to achieve a more seamless look.
#4 Consider Moisture Issues:
When considering installing engineered hardwood over tile, assess the potential for moisture issues. Even if the tile surface appears dry and in good condition, moisture can seep through the grout lines and affect the wood flooring.
Installing a moisture barrier or underlayment will prevent moisture from reaching the hardwood and ensure its longevity.
#5 Consider the Room Grade:
When planning to install engineered hardwood, consider the grade of the room. Below-grade rooms may not be suitable for this type of flooring due to higher moisture levels.
Above-grade rooms are typically suitable for engineered hardwood installation. However, below-grade rooms, such as basements, may have higher moisture levels that can damage the flooring over time.
Should I remove the cracked tile before installing engineered hardwood?
Removing any loose or cracked tiles on the subfloor before laying down the engineered hardwood is a good idea. Loose or cracked tiles can cause your installation to fail, resulting in an uneven surface and potential damage to your new flooring.
Removing these tiles will provide a smooth and stable surface for your engineered hardwood to be installed on. To avoid potential issues, take the time to properly prepare your subfloor before installing any flooring.
Do I need a moisture barrier under engineered hardwood?

If you’ve decided to install engineered hardwood over your tile flooring, consider how to protect your new flooring from moisture damage. Engineered hardwood is more moisture-resistant than solid hardwood but is still vulnerable to excess humidity, standing water, and spills.
Therefore, you’ll need to install a moisture-resistant barrier beneath it to keep your engineered hardwood flooring in good condition. This barrier will protect against water damage and other moisture issues that could cause swelling or mold growth.
What should I put under engineered hardwood?
To ensure the longevity and durability of your new engineered hardwood flooring, use a high-quality cork and foam underlayment. This will prevent moisture build-up under your floors, keep them warm, and reduce noise.
Investing in quality underlayment is an essential step in the installation process. It will provide a solid foundation for your new engineered hardwood floors and help to even out any subfloor imperfections.
Revamp Your Flooring with Ease: Installing Engineered Hardwood Over Tile
Putting engineered hardwood over tile can be a great way to update your flooring without the hassle and expense of removing the existing tile. However, research and ensure that you take all the necessary steps for a successful installation.
Consider some factors beforehand. Ensure the tile is in pristine condition and properly attached to the subfloor. If any tiles are loose or cracked, remove them, and inspect the subfloor for any damage or moisture problems.
You can use different installation methods like floating, glue-down, or nail-down, but choose the proper method based on the subfloor’s condition. Before installation, you should also decide if you need a moisture barrier and what underlayment would suit you.